0%

SUMMARY

您可以在群集处于online并in service状态时升级Ceph群集中的daemons!某些类型的daemons依赖于其他daemon。例如,Ceph
Metadata Servers和Ceph Object Gateways依赖于Ceph
Monitors和Ceph OSD Daemons。我们建议按以下顺序升级:

1、Ceph Deploy

2、Ceph Monitors

3、Ceph OSD Daemons

4、Ceph Metadata Servers

5、Ceph Object Gateways

通常,我们建议升级所有daemons以确保它们都在同一版本上(例如,所有ceph-mon daemons,所有ceph-osd daemons等)。我们还建议您先升级集群中的所有daemons,然后再尝试使用新功能。

Upgrade Procedures比较简单,在升级之前需要查看release notes document of your release。基础过程包括三个步骤:

1、 在admin节点上使用ceph-deploy为多个host升级packages(使用ceph-deploy install命令),或者登陆到每个host使用package manager升级Ceph package。例如,在升级Monitors时,ceph-deploy语法可能如下所示:

1
2
3
ceph-deploy install --release {release-name} ceph-node1[ ceph-node2]

ceph-deploy install --release firefly mon1 mon2 mon3

注意:ceph-deploy install命令会将指定节点中的packages从旧版本升级到你指定的版本。(该工具不存在ceph-deploy upgrade命令)

2、 登陆到每个Ceph节点,然后重新启动每个Ceph daemon,有关详细信息,请参见Operating a Cluster

3、 确保您的群集healthy。有关详细信息,请参见Monitoring a Cluster

重要说明:升级daemon后,将无法降级。

CEPH DEPLOY

在升级Ceph daemons之前,先升级ceph-deploy工具。

1
sudo pip install -U ceph-deploy

1
sudo apt-get install ceph-deploy

1
sudo yum install ceph-deploy python-pushy

UPGRADE PROCEDURES

以下各节描述了升级过程。

重要说明:每个Ceph版本可能都有一些其他步骤。在开始升级daemons之前,请详细阅读release notes document of your release

UPGRADING MONITORS

要升级monitors,执行以下步骤:

1、为每个daemon instance升级Ceph package。

可以使用ceph-deploy一次指定所有的monitor节点。例如:

1
2
ceph-deploy install --release {release-name} ceph-node1[ ceph-node2]
ceph-deploy install --release hammer mon1 mon2 mon3

你也可以在每个节点上使用distro’s package manager。对于Debian/Ubuntu,在每个主机上执行以下步骤:

1
2
ssh {osd-host}
sudo apt-get update && sudo apt-get install ceph

对于CentOS/Red Hat,执行以下步骤:

1
2
ssh {osd-host}
sudo yum update && sudo yum install ceph

2、重新启动每个monitor,对于Ubuntu

1
sudo restart ceph-mon id={hostname}

对于CentOS/Red Hat/Debian,使用:

1
sudo /etc/init.d/ceph restart {mon-id}

对于CentOS/Red Hat通过ceph-deploy部署的集群,monitor ID通常为mon.{hostname}。

3、确保每个monitor都重新quorum

1
ceph mon stat

确保你已完成所有Ceph Monitor的升级步骤。

UPGRADING AN OSD

要升级Ceph OSD Daemon,请执行以下步骤:

1、 升级Ceph OSD Daemon package。

可以使用ceph-deploy一次指定所有的monitor节点。例如:

1
2
ceph-deploy install --release {release-name} ceph-node1[ ceph-node2]
ceph-deploy install --release hammer osd1 osd2 osd3

你也可以在每个节点上使用distro’s package manager。对于Debian/Ubuntu,在每个主机上执行以下步骤:

1
2
ssh {osd-host}
sudo apt-get update && sudo apt-get install ceph

对于CentOS / Red Hat,执行以下步骤:

1
2
ssh {osd-host}
sudo yum update && sudo yum install ceph

2、重新启动OSD,其中N是OSD number。对于Ubuntu,请使用:

1
sudo restart ceph-osd id=N

对于主机上的多个OSD,可以使用Upstart重新启动所有OSD。

1
sudo restart ceph-osd-all

对于CentOS/Red Hat/Debian,使用:

1
sudo /etc/init.d/ceph restart N

3、确保每个升级的Ceph OSD Daemon都已重新加入集群:

1
ceph osd stat

确保你已完成所有Ceph OSD Daemons的升级步骤。

UPGRADING A METADATA SERVER

要升级Ceph Metadata Server,请执行以下步骤:

1、升级Ceph Metadata Server package。可以使用ceph-deploy一次指定所有的Ceph Metadata Server节点,或在每个节点上使用package manager。例如:

1
2
ceph-deploy install --release {release-name} ceph-node1
ceph-deploy install --release hammer mds1

要手动升级packages,请在每个Debian/Ubuntu节点上执行以下步骤:

1
2
ssh {mon-host}
sudo apt-get update && sudo apt-get install ceph-mds

或在CentOS/Red Hat节点上执行:

1
2
ssh {mon-host}
sudo yum update && sudo yum install ceph-mds

2、重新启动metadata server。对于Ubuntu,请使用:

1
sudo restart ceph-mds id={hostname}

对于CentOS/Red Hat/Debian,使用:

1
sudo /etc/init.d/ceph restart mds.{hostname}

对于使用ceph-deploy部署的集群,name通常是您在创建时指定的name或hostname。

3、确保metadata server已启动并正在运行:

1
ceph mds stat

UPGRADING A CLIENT

升级packages并在Ceph集群上重新启动daemons后,我们建议您也升级client节点上的ceph-common和client libraries(librbd1和librados2)。

1、 升级package。

1
2
ssh {client-host}
apt-get update && sudo apt-get install ceph-common librados2 librbd1 python-rados python-rbd

2、确保已升级为新版本

1
ceph --version

如果没有升级为最新版本,则需要卸载,auto remove dependencies并重新安装。

实践

升级Ceph服务端package

升级可能带来的影响

1
2
(1)服务端升级可能会影响客户业务,导致业务中断一定时间。如果cephfs或rgw前端有流量(install ceph package时会自动停掉mds与rgw service),请先将升级节点流量先转向其他节点。
(2)如果容器中有ceph client packages,同样需要逐一转走流量,再升级

原文

UPGRADING FROM PRE-LUMINOUS RELEASES (LIKE JEWEL)

您必须先升级到Luminous(12.2.z),然后再尝试升级到Nautilus。 另外,您的集群必须在运行Luminous的同时至少完成了所有PG的一次scrub,并在OSD map中设置了recovery_deletes和purged_snapdirs标志。

UPGRADING FROM MIMIC OR LUMINOUS

NOTES

1
2
3
在从Luminous升级到Nautilus的过程中,将monitors升级到Nautilus后,将无法使用Luminous ceph-osd daemon创建新的OSD。我们建议您避免在升级过程中添加或替换任何OSD。
我们建议您避免在升级过程中创建任何RADOS pools。
您可以使用ceph version(s)命令在每个阶段监视升级进度,该命令将告诉您每种daemon正在运行的ceph版本。

UPGRADE COMPATIBILITY NOTES(升级兼容性说明)

这些更改发生在Mimic和Nautilus版本之间。

  • ceph pg stat输出已修改为json格式,以匹配ceph df输出:

    • “raw_bytes” field renamed to “total_bytes”
    • “raw_bytes_avail” field renamed to “total_bytes_avail”
    • “raw_bytes_avail” field renamed to “total_bytes_avail”
    • “raw_bytes_used” field renamed to “total_bytes_raw_used”
    • 添加了“total_bytes_used” field 来表示分配给block(slow) device上data objects的(所有OSD)空间
  • ceph df [detail]输出(GLOBAL section)格式进行了修改:

    • 新的‘USED’ column显示了分配给block(slow) device上data objects的(所有OSD)空间
    • 现在,‘RAW USED’ 是‘USED’空间与为Ceph目的在块设备上分配/保留的空间之和。BlueStore的BlueFS部分。

INSTRUCTIONS(使用说明)

1
2
3
4
5
6
7
8
9
10
11
12
13
14
15
16
17
18
19
20
21
22
23
24
25
26
27
28
29
30
31
32
33
34
35
36
37
38
39
40
41
42
43
44
45
46
47
48
49
50
51
52
53
54
55
56
57
58
59
60
61
62
63
64
65
66
67
68
69
70
71
72
73
74
75
76
77
78
79
80
81
82
83
84
85
86
87
88
89
90
91
92
93
94
95
96
97
98
99
100
101
102
103
104
105
106
107
108
109
110
1、如果您的集群最初安装的是Luminous之前的版本,请确保在运行Luminous时集群已完成对所有PG的至少一次完整scrub。否则,将导致您的monitor daemons在启动时拒绝加入quorum,从而使其无法运行。如果不确定Luminous集群是否已完成所有PG的完全scrub,则可以通过运行以下命令检查集群的状态:
ceph osd dump | grep ^flags (OSD map必须包含recovery_deletes和purged_snapdirs标志)

如果您的OSD map不包含这两个标志,则只需等待大约24-48小时,在标准群集配置中,应该有充足的时间,以便至少一次scrub所有placement groups,然后重复上述过程 重新检查。
如果您刚刚完成了对Luminous的升级,并且想在短时间内进行升级到Mimic,可以使用shell命令在所有placement groups上强制执行scrub,例如:
ceph pg dump pgs_brief | cut -d " " -f 1 | xargs -n1 ceph pg scrub
您应该考虑到这种强制性scrub可能会对您的Ceph客户的性能产生负面影响。

2、确保您的群集stable且healthy(没有宕机或无法恢复的OSD)。 (可选,但推荐。)

3、在升级期间设置noout标志。 (可选,但建议使用。)
ceph osd set noout

4、通过安装新软件包并重新启动monitor daemons来升级monitors。 例如,在每个monitors主机上,:
systemctl restart ceph-mon.target
所有monitors启动之后,通过在mon map中查找nautilus字符串来验证monitor升级是否完成。 命令:
ceph mon dump | grep min_mon_release
应报告:
min_mon_release 14 (nautilus)
如果不是,则表示尚未升级和重新启动monitors,或者quorum不包括所有monitors。

5、通过安装新packages并重新启动所有manager daemons来升级ceph-mgr daemons。 例如,在每个manager主机上,:
systemctl restart ceph-mgr.target
请注意,如果您使用的是Ceph Dashboard,则升级ceph-mgr package后可能需要单独安装ceph-mgr-dashboard。ceph-mgr-dashboard的安装脚本将自动为您重新启动manager daemons。 因此,在这种情况下,您可以跳过该步骤以重新启动daemons。
通过检查ceph -s来验证ceph-mgr daemons是否正在运行:
# ceph -s
...
services:
mon: 3 daemons, quorum foo,bar,baz
mgr: foo(active), standbys: bar, baz
...

6、通过安装新packages并在所有OSD主机上重新启动ceph-osd daemons来升级所有OSD:
systemctl restart ceph-osd.target
您可以使用ceph versions或ceph osd versions命令监视OSD升级的进度:
# ceph osd versions
{
"ceph version 13.2.5 (...) mimic (stable)": 12,
"ceph version 14.2.0 (...) nautilus (stable)": 22,
}

7、如果集群中通过ceph-disk部署了OSD(例如,几乎所有在Mimic版本之前创建的OSD),您都需要让ceph-volume承担启动daemons的责任。 在包含OSD的每个主机上,确保OSD当前正在运行,然后:
ceph-volume simple scan (所有使用ceph-disk创建的并正在运行的OSDs,从OSD data partition或directory中捕获元数据)
ceph-volume simple activate --all (使systemd units可以mount已配置的devices,并启动Ceph OSD)
我们建议按照此步骤重新启动每个OSD主机,以验证OSD是否自动启动。
请注意,ceph-volume不具有与ceph-disk相同的hot-plug功能,后者通过udev events自动检测到新连接的磁盘。如果运行上述scan命令时OSD当前未running,或者将基于ceph-disk的OSD移至新主机,或者重新安装了主机OSD,或者/etc/ceph/osd目录丢失, 您将需要显式扫描每个ceph-disk OSD的主数据分区。例如,:
ceph-volume simple scan /dev/sdb1
输出将包括相应的ceph-volume simple activate命令以启用OSD。

8、升级所有CephFS MDS daemons。 对于每个CephFS file system,
8.1 将ranks数减少到1。(如果您打算稍后还原它,请首先记录MDS守护程序的原始数量):
ceph status
ceph fs set <fs_name> max_mds 1
8.2 通过定期检查状态,等待集群停用所有non-zero ranks:
ceph status
8.3 使用以下命令使所有standby MDS daemons在适当的主机上offline:
systemctl stop ceph-mds@<daemon_name>
8.4 确认只有一个MDS处于online,并且您的FS的rank 0:
ceph status
8.5 通过安装新packages并重新启动daemon来升级剩余的MDS daemon:
systemctl restart ceph-mds.target

8.6 重新启动所有已offline的standby MDS daemons
systemctl start ceph-mds.target

8.7 恢复该volume的max_mds原始值:
ceph fs set <fs_name> max_mds <original_max_mds>

9、通过升级packages并在所有主机上重新启动daemons来升级所有radosgw daemons:
systemctl restart ceph-radosgw.target

10、禁用Nautilus之前的OSD并启用所有Nautilus的新功能来完成升级:
ceph osd require-osd-release nautilus

11、如果您一开始设置noout,请确保清除它:
ceph osd unset noout

12、使用ceph health验证集群是否healthy
如果您的CRUSH tunables(可调参数)早于Hammer,Ceph现在将发出健康警告。 如果您看到有这种效果的健康警报,则可以使用以下方法还原此更改:
ceph config set mon mon_crush_min_required_version firefly
但是,如果Ceph没有警报,那么我们建议您也将所有现有的CRUSH buckets都切换到straw2,这是Hammer版本中重新添加的。如果您有任何“straw” buckets,这将导致少量的数据移动,但通常不会太严重。
ceph osd getcrushmap -o backup-crushmap
ceph osd crush set-all-straw-buckets-to-straw2
如果有问题,您可以还原:
ceph osd setcrushmap -i backup-crushmap
移至“straw2” buckets将解锁一些最新功能,例如在Luminous中crush-compat balancer mode(https://docs.ceph.com/docs/master/rados/operations/balancer/#balancer)。

13、要启用新的 v2 network protocol,请发出以下命令:
ceph mon enable-msgr2
指示所有与旧版v1 protocol绑定到旧的默认端口6789的monitors,同时也绑定到新的3300 v2 protocol端口。要查看是否所有monitors都已更新,请执行以下操作:
ceph mon dump
并确认每个monitors都显示v2:和v1:地址。

14、对于已升级的每个主机,应更新ceph.conf文件,使其不指定monitor端口(如果您在默认端口上运行monitor),或者显式引用v2和v1地址和端口。 如果仅列出了v1 IP和端口,则一切仍将起作用,但是在得知monitor也使用v2协议后,每个CLI实例或daemon都将需要重新连接,这会减慢速度并阻止完全过渡到v2协议。
这也是将ceph.conf中的所有配置选项完全转换到集群的配置数据库中的好时机。 在每个主机上,您可以使用以下命令通过以下命令将所有选项导入monitor:
ceph config assimilate-conf -i /etc/ceph/ceph.conf
您可以通过以下方式查看集群的配置数据库:
ceph config dump
要为每个主机创建一个最小但足够的ceph.conf,请执行以下操作:
ceph config generate-minimal-conf > /etc/ceph/ceph.conf.new
mv /etc/ceph/ceph.conf.new /etc/ceph/ceph.conf
确保仅在已升级到Nautilus的主机上使用此新配置,因为它可能包含mon_host值,该值包含Nautilus能理解的IP地址的新v2:和v1:前缀。
有关更多信息,请参阅https://docs.ceph.com/docs/master/rados/configuration/msgr2/#msgr2-ceph-conf

15、考虑启用telemetry module以将匿名使用情况统计信息和崩溃信息发送给Ceph upstream developers。 查看将要报告的内容(实际上没有向任何人发送任何信息),请执行以下操作:
ceph mgr module enable telemetry
ceph telemetry show
如果您对所报告的数据感到满意,则可以选择使用以下方法自动报告high-level cluster metadata:
ceph telemetry on
有关telemetry module的更多信息,请参见文档:https://docs.ceph.com/docs/master/mgr/telemetry/#telemetry

1、查看当前环境与版本

1
2
3
4
5
6
7
8
9
10
11
12
13
14
15
16
17
18
19
20
21
22
23
24
25
26
27
28
29
30
31
32
33
34
35
36
37
38
39
40
41
42
43
44
45
46
47
48
49
50
51
52
53
54
55
56
57
58
59
60
61
62
63
64
[root@ceph2 ~]# ceph -v
ceph version 12.2.12 (1436006594665279fe734b4c15d7e08c13ebd777) luminous (stable)

[root@ceph2 ~]# cat /etc/redhat-release
CentOS Linux release 7.6.1810 (Core)

[root@ceph2 ~]# uname -a
Linux ceph2 3.10.0-957.el7.x86_64 #1 SMP Thu Nov 8 23:39:32 UTC 2018 x86_64 x86_64 x86_64 GNU/Linux

[root@ceph2 ~]# ceph -s
cluster:
id: c4051efa-1997-43ef-8497-fb02bdf08233
health: HEALTH_OK

services:
mon: 3 daemons, quorum ceph1,ceph3,ceph2
mgr: ceph2(active), standbys: ceph3, ceph1
mds: cephfs-1/1/1 up {0=ceph1=up:active}, 2 up:standby
osd: 6 osds: 6 up, 6 in
rgw: 3 daemons active

data:
pools: 7 pools, 176 pgs
objects: 244 objects, 5.27KiB
usage: 6.04GiB used, 293GiB / 299GiB avail
pgs: 176 active+clean

io:
client: 2.00KiB/s rd, 0B/s wr, 1op/s rd, 1op/s wr

[root@ceph2 ~]# ceph osd tree
ID CLASS WEIGHT TYPE NAME STATUS REWEIGHT PRI-AFF
-1 0.29214 root default
-5 0.09738 host ceph1
1 hdd 0.04869 osd.1 up 1.00000 1.00000
4 hdd 0.04869 osd.4 up 1.00000 1.00000
-7 0.09738 host ceph2
2 hdd 0.04869 osd.2 up 1.00000 1.00000
5 hdd 0.04869 osd.5 up 1.00000 1.00000
-3 0.09738 host ceph3
0 hdd 0.04869 osd.0 up 1.00000 1.00000
3 hdd 0.04869 osd.3 up 1.00000 1.00000

[root@ceph2 ~]# rpm -qa | grep ceph
libcephfs2-12.2.12-0.el7.x86_64
ceph-common-12.2.12-0.el7.x86_64
ceph-radosgw-12.2.12-0.el7.x86_64
ceph-base-12.2.12-0.el7.x86_64
ceph-osd-12.2.12-0.el7.x86_64
ceph-mds-12.2.12-0.el7.x86_64
python-cephfs-12.2.12-0.el7.x86_64
ceph-selinux-12.2.12-0.el7.x86_64
ceph-mon-12.2.12-0.el7.x86_64
ceph-mgr-12.2.12-0.el7.x86_64

[root@ceph2 ~]# rpm -qa | grep rbd
python-rbd-12.2.12-0.el7.x86_64
librbd1-12.2.12-0.el7.x86_64

[root@ceph2 ~]# rpm -qa | grep rados
ceph-radosgw-12.2.12-0.el7.x86_64
librados2-12.2.12-0.el7.x86_64
python-rados-12.2.12-0.el7.x86_64
libradosstriper1-12.2.12-0.el7.x86_64

2、修改每台ceph节点的ceph mirror,L版地址修改为N版地址

1
2
3
4
5
6
[root@ceph2 ~]# vim /etc/yum.repos.d/ceph_stable.repo 
[ceph_stable]
baseurl = http://mirrors.163.com/ceph/rpm-nautilus/el7/$basearch
gpgcheck = 1
gpgkey = http://mirrors.163.com/ceph/keys/release.asc
name = Ceph Stable repo

3、设置noout 标志停机维护

1
2
3
4
5
6
7
8
9
10
11
12
13
14
15
16
17
18
19
20
21
22
[root@ceph2 ~]# ceph osd set noout

[root@ceph2 ~]# ceph -s
cluster:
id: c4051efa-1997-43ef-8497-fb02bdf08233
health: HEALTH_WARN
insufficient standby MDS daemons available
noout flag(s) set

services:
mon: 3 daemons, quorum ceph1,ceph3,ceph2
mgr: ceph1(active), standbys: ceph3, ceph2
mds: cephfs-1/1/1 up {0=ceph2=up:active}
osd: 6 osds: 6 up, 6 in
flags noout
rgw: 2 daemons active

data:
pools: 7 pools, 176 pgs
objects: 245 objects, 5.30KiB
usage: 6.05GiB used, 293GiB / 299GiB avail
pgs: 176 active+clean

4、升级每台ceph节点的 ceph packages(一个节点一个节点的升)

升级顺序

1
2
3
4
5
1、Ceph Monitors
2、Ceph Mgr
3、Ceph OSD Daemons
4、Ceph Metadata Servers
5、Ceph Object Gateways

升级命令(注意:安装过程中rgw与mds服务会自动被stop

1
2
3
4
5
6
7
8
9
10
11
12
13
14
15
16
17
18
19
20
21
22
23
24
25
26
27
28
29
30
31
32
33
34
35
36
37
38
39
40
41
42
43
44
45
46
47
48
49
50
51
52
53
54
55
56
57
58
59
60
61
62
63
64
65
66
67
68
69
70
71
72
73
74
75
76
77
78
79
80
81
82
83
84
85
86
87
88
89
90
91
92
93
94
95
96
97
98
99
100
101
102
103
104
105
106
107
108
109
110
111
112
113
114
115
116
117
118
119
120
121
122
123
124
125
126
127
128
129
130
131
132
133
134
135
136
137
138
139
140
141
142
143
144
145
146
147
148
149
150
151
152
153
154
155
156
157
158
159
160
161
162
163
164
165
166
167
168
169
170
171
172
173
174
175
176
177
178
179
180
181
182
183
184
185
186
187
188
189
190
191
192
193
194
195
196
197
198
199
200
201
202
203
204
205
206
207
208
209
210
211
212
213
214
215
216
217
218
219
220
221
222
223
224
225
226
227
228
229
230
231
232
233
234
235
236
237
238
239
240
241
242
243
244
245
246
247
248
249
250
251
252
253
254
255
256
257
258
259
260
261
262
263
264
265
266
267
268
269
270
271
272
273
274
275
276
277
278
279
280
281
282
283
284
285
286
287
288
289
290
291
292
293
294
295
296
297
298
299
300
301
302
303
304
305
306
307
308
309
310
311
312
313
314
315
316
317
318
319
320
321
322
323
324
325
326
327
328
329
330
331
332
333
334
335
[root@ceph2 ~]# yum install ceph
Loaded plugins: fastestmirror
Determining fastest mirrors
epel/x86_64/metalink | 6.5 kB 00:00:00
* base: mirrors.huaweicloud.com
* epel: mirrors.aliyun.com
* extras: mirrors.huaweicloud.com
* updates: mirrors.huaweicloud.com
base | 3.6 kB 00:00:00
ceph_stable | 2.9 kB 00:00:00
epel | 5.3 kB 00:00:00
extras | 2.9 kB 00:00:00
updates | 2.9 kB 00:00:00
(1/8): epel/x86_64/group_gz | 88 kB 00:00:00
(2/8): ceph_stable/x86_64/primary_db | 192 kB 00:00:01
(3/8): base/7/x86_64/group_gz | 165 kB 00:00:01
(4/8): epel/x86_64/updateinfo | 1.0 MB 00:00:02
(5/8): extras/7/x86_64/primary_db | 152 kB 00:00:01
(6/8): base/7/x86_64/primary_db | 6.0 MB 00:00:04
(7/8): updates/7/x86_64/primary_db | 1.9 MB 00:00:05
(8/8): epel/x86_64/primary_db | 6.9 MB 00:00:16
Resolving Dependencies
--> Running transaction check
---> Package ceph.x86_64 2:14.2.4-0.el7 will be installed
--> Processing Dependency: ceph-osd = 2:14.2.4-0.el7 for package: 2:ceph-14.2.4-0.el7.x86_64
--> Processing Dependency: ceph-mds = 2:14.2.4-0.el7 for package: 2:ceph-14.2.4-0.el7.x86_64
--> Processing Dependency: ceph-mgr = 2:14.2.4-0.el7 for package: 2:ceph-14.2.4-0.el7.x86_64
--> Processing Dependency: ceph-mon = 2:14.2.4-0.el7 for package: 2:ceph-14.2.4-0.el7.x86_64
--> Running transaction check
---> Package ceph-mds.x86_64 2:12.2.12-0.el7 will be updated
---> Package ceph-mds.x86_64 2:14.2.4-0.el7 will be an update
--> Processing Dependency: ceph-base = 2:14.2.4-0.el7 for package: 2:ceph-mds-14.2.4-0.el7.x86_64
--> Processing Dependency: librdmacm.so.1()(64bit) for package: 2:ceph-mds-14.2.4-0.el7.x86_64
---> Package ceph-mgr.x86_64 2:12.2.12-0.el7 will be updated
---> Package ceph-mgr.x86_64 2:14.2.4-0.el7 will be an update
--> Processing Dependency: python-bcrypt for package: 2:ceph-mgr-14.2.4-0.el7.x86_64
---> Package ceph-mon.x86_64 2:12.2.12-0.el7 will be updated
---> Package ceph-mon.x86_64 2:14.2.4-0.el7 will be an update
---> Package ceph-osd.x86_64 2:12.2.12-0.el7 will be updated
---> Package ceph-osd.x86_64 2:14.2.4-0.el7 will be an update
--> Processing Dependency: libstoragemgmt for package: 2:ceph-osd-14.2.4-0.el7.x86_64
--> Running transaction check
---> Package ceph-base.x86_64 2:12.2.12-0.el7 will be updated
--> Processing Dependency: ceph-base = 2:12.2.12-0.el7 for package: 2:ceph-selinux-12.2.12-0.el7.x86_64
--> Processing Dependency: ceph-base = 2:12.2.12-0.el7 for package: 2:ceph-radosgw-12.2.12-0.el7.x86_64
---> Package ceph-base.x86_64 2:14.2.4-0.el7 will be an update
--> Processing Dependency: librados2 = 2:14.2.4-0.el7 for package: 2:ceph-base-14.2.4-0.el7.x86_64
--> Processing Dependency: libcephfs2 = 2:14.2.4-0.el7 for package: 2:ceph-base-14.2.4-0.el7.x86_64
--> Processing Dependency: librgw2 = 2:14.2.4-0.el7 for package: 2:ceph-base-14.2.4-0.el7.x86_64
--> Processing Dependency: librbd1 = 2:14.2.4-0.el7 for package: 2:ceph-base-14.2.4-0.el7.x86_64
--> Processing Dependency: ceph-common = 2:14.2.4-0.el7 for package: 2:ceph-base-14.2.4-0.el7.x86_64
--> Processing Dependency: liboath.so.0(LIBOATH_1.10.0)(64bit) for package: 2:ceph-base-14.2.4-0.el7.x86_64
--> Processing Dependency: liboath.so.0(LIBOATH_1.12.0)(64bit) for package: 2:ceph-base-14.2.4-0.el7.x86_64
--> Processing Dependency: liboath.so.0(LIBOATH_1.2.0)(64bit) for package: 2:ceph-base-14.2.4-0.el7.x86_64
--> Processing Dependency: liboath.so.0()(64bit) for package: 2:ceph-base-14.2.4-0.el7.x86_64
---> Package librdmacm.x86_64 0:22.1-3.el7 will be installed
---> Package libstoragemgmt.x86_64 0:1.7.3-3.el7 will be installed
--> Processing Dependency: libstoragemgmt-python for package: libstoragemgmt-1.7.3-3.el7.x86_64
--> Processing Dependency: libyajl.so.2()(64bit) for package: libstoragemgmt-1.7.3-3.el7.x86_64
--> Processing Dependency: libconfig.so.9()(64bit) for package: libstoragemgmt-1.7.3-3.el7.x86_64
---> Package python2-bcrypt.x86_64 0:3.1.6-2.el7 will be installed
--> Processing Dependency: python-cffi for package: python2-bcrypt-3.1.6-2.el7.x86_64
--> Processing Dependency: python2-six for package: python2-bcrypt-3.1.6-2.el7.x86_64
--> Running transaction check
---> Package ceph-common.x86_64 2:12.2.12-0.el7 will be updated
---> Package ceph-common.x86_64 2:14.2.4-0.el7 will be an update
--> Processing Dependency: libradosstriper1 = 2:14.2.4-0.el7 for package: 2:ceph-common-14.2.4-0.el7.x86_64
--> Processing Dependency: python-cephfs = 2:14.2.4-0.el7 for package: 2:ceph-common-14.2.4-0.el7.x86_64
--> Processing Dependency: python-rbd = 2:14.2.4-0.el7 for package: 2:ceph-common-14.2.4-0.el7.x86_64
--> Processing Dependency: python-ceph-argparse = 2:14.2.4-0.el7 for package: 2:ceph-common-14.2.4-0.el7.x86_64
--> Processing Dependency: python-rados = 2:14.2.4-0.el7 for package: 2:ceph-common-14.2.4-0.el7.x86_64
--> Processing Dependency: python-rgw = 2:14.2.4-0.el7 for package: 2:ceph-common-14.2.4-0.el7.x86_64
--> Processing Dependency: librabbitmq.so.4()(64bit) for package: 2:ceph-common-14.2.4-0.el7.x86_64
---> Package ceph-radosgw.x86_64 2:12.2.12-0.el7 will be updated
---> Package ceph-radosgw.x86_64 2:14.2.4-0.el7 will be an update
---> Package ceph-selinux.x86_64 2:12.2.12-0.el7 will be updated
---> Package ceph-selinux.x86_64 2:14.2.4-0.el7 will be an update
--> Processing Dependency: selinux-policy-base >= 3.13.1-229.el7_6.15 for package: 2:ceph-selinux-14.2.4-0.el7.x86_64
---> Package libcephfs2.x86_64 2:12.2.12-0.el7 will be updated
---> Package libcephfs2.x86_64 2:14.2.4-0.el7 will be an update
---> Package libconfig.x86_64 0:1.4.9-5.el7 will be installed
---> Package liboath.x86_64 0:2.6.2-1.el7 will be installed
---> Package librados2.x86_64 2:12.2.12-0.el7 will be updated
---> Package librados2.x86_64 2:14.2.4-0.el7 will be an update
---> Package librbd1.x86_64 2:12.2.12-0.el7 will be updated
---> Package librbd1.x86_64 2:14.2.4-0.el7 will be an update
---> Package librgw2.x86_64 2:12.2.12-0.el7 will be updated
---> Package librgw2.x86_64 2:14.2.4-0.el7 will be an update
---> Package libstoragemgmt-python.noarch 0:1.7.3-3.el7 will be installed
--> Processing Dependency: libstoragemgmt-python-clibs for package: libstoragemgmt-python-1.7.3-3.el7.noarch
---> Package python-cffi.x86_64 0:1.6.0-5.el7 will be installed
--> Processing Dependency: python-pycparser for package: python-cffi-1.6.0-5.el7.x86_64
---> Package python2-six.noarch 0:1.9.0-0.el7 will be installed
---> Package yajl.x86_64 0:2.0.4-4.el7 will be installed
--> Running transaction check
---> Package librabbitmq.x86_64 0:0.8.0-2.el7 will be installed
---> Package libradosstriper1.x86_64 2:12.2.12-0.el7 will be updated
---> Package libradosstriper1.x86_64 2:14.2.4-0.el7 will be an update
---> Package libstoragemgmt-python-clibs.x86_64 0:1.7.3-3.el7 will be installed
---> Package python-ceph-argparse.x86_64 2:14.2.4-0.el7 will be installed
---> Package python-cephfs.x86_64 2:12.2.12-0.el7 will be updated
---> Package python-cephfs.x86_64 2:14.2.4-0.el7 will be an update
---> Package python-pycparser.noarch 0:2.14-1.el7 will be installed
--> Processing Dependency: python-ply for package: python-pycparser-2.14-1.el7.noarch
---> Package python-rados.x86_64 2:12.2.12-0.el7 will be updated
---> Package python-rados.x86_64 2:14.2.4-0.el7 will be an update
---> Package python-rbd.x86_64 2:12.2.12-0.el7 will be updated
---> Package python-rbd.x86_64 2:14.2.4-0.el7 will be an update
---> Package python-rgw.x86_64 2:12.2.12-0.el7 will be updated
---> Package python-rgw.x86_64 2:14.2.4-0.el7 will be an update
---> Package selinux-policy-targeted.noarch 0:3.13.1-229.el7 will be updated
---> Package selinux-policy-targeted.noarch 0:3.13.1-252.el7.1 will be an update
--> Processing Dependency: selinux-policy = 3.13.1-252.el7.1 for package: selinux-policy-targeted-3.13.1-252.el7.1.noarch
--> Running transaction check
---> Package python-ply.noarch 0:3.4-11.el7 will be installed
---> Package selinux-policy.noarch 0:3.13.1-229.el7 will be updated
---> Package selinux-policy.noarch 0:3.13.1-252.el7.1 will be an update
--> Finished Dependency Resolution

Dependencies Resolved

=============================================================================================================================================================================================================================================
Package Arch Version Repository Size
=============================================================================================================================================================================================================================================
Installing:
ceph x86_64 2:14.2.4-0.el7 ceph_stable 3.0 k
Installing for dependencies:
libconfig x86_64 1.4.9-5.el7 base 59 k
liboath x86_64 2.6.2-1.el7 epel 51 k
librabbitmq x86_64 0.8.0-2.el7 base 37 k
librdmacm x86_64 22.1-3.el7 base 63 k
libstoragemgmt x86_64 1.7.3-3.el7 base 243 k
libstoragemgmt-python noarch 1.7.3-3.el7 base 167 k
libstoragemgmt-python-clibs x86_64 1.7.3-3.el7 base 19 k
python-ceph-argparse x86_64 2:14.2.4-0.el7 ceph_stable 36 k
python-cffi x86_64 1.6.0-5.el7 base 218 k
python-ply noarch 3.4-11.el7 base 123 k
python-pycparser noarch 2.14-1.el7 base 104 k
python2-bcrypt x86_64 3.1.6-2.el7 epel 39 k
python2-six noarch 1.9.0-0.el7 epel 2.9 k
yajl x86_64 2.0.4-4.el7 base 39 k
Updating for dependencies:
ceph-base x86_64 2:14.2.4-0.el7 ceph_stable 5.4 M
ceph-common x86_64 2:14.2.4-0.el7 ceph_stable 18 M
ceph-mds x86_64 2:14.2.4-0.el7 ceph_stable 1.8 M
ceph-mgr x86_64 2:14.2.4-0.el7 ceph_stable 1.5 M
ceph-mon x86_64 2:14.2.4-0.el7 ceph_stable 4.5 M
ceph-osd x86_64 2:14.2.4-0.el7 ceph_stable 16 M
ceph-radosgw x86_64 2:14.2.4-0.el7 ceph_stable 5.3 M
ceph-selinux x86_64 2:14.2.4-0.el7 ceph_stable 21 k
libcephfs2 x86_64 2:14.2.4-0.el7 ceph_stable 480 k
librados2 x86_64 2:14.2.4-0.el7 ceph_stable 3.3 M
libradosstriper1 x86_64 2:14.2.4-0.el7 ceph_stable 342 k
librbd1 x86_64 2:14.2.4-0.el7 ceph_stable 1.6 M
librgw2 x86_64 2:14.2.4-0.el7 ceph_stable 4.6 M
python-cephfs x86_64 2:14.2.4-0.el7 ceph_stable 91 k
python-rados x86_64 2:14.2.4-0.el7 ceph_stable 190 k
python-rbd x86_64 2:14.2.4-0.el7 ceph_stable 171 k
python-rgw x86_64 2:14.2.4-0.el7 ceph_stable 76 k
selinux-policy noarch 3.13.1-252.el7.1 updates 492 k
selinux-policy-targeted noarch 3.13.1-252.el7.1 updates 7.0 M

Transaction Summary
=============================================================================================================================================================================================================================================
Install 1 Package (+14 Dependent packages)
Upgrade ( 19 Dependent packages)

Total download size: 72 M
Is this ok [y/d/N]: y
Downloading packages:
Delta RPMs disabled because /usr/bin/applydeltarpm not installed.
(1/34): ceph-14.2.4-0.el7.x86_64.rpm | 3.0 kB 00:00:00
(2/34): ceph-common-14.2.4-0.el7.x86_64.rpm | 18 MB 00:00:19
(3/34): ceph-mds-14.2.4-0.el7.x86_64.rpm | 1.8 MB 00:00:01
(4/34): ceph-mgr-14.2.4-0.el7.x86_64.rpm | 1.5 MB 00:00:03
(5/34): ceph-mon-14.2.4-0.el7.x86_64.rpm | 4.5 MB 00:00:05
(6/34): ceph-osd-14.2.4-0.el7.x86_64.rpm | 16 MB 00:00:14
(7/34): ceph-radosgw-14.2.4-0.el7.x86_64.rpm | 5.3 MB 00:00:07
(8/34): ceph-selinux-14.2.4-0.el7.x86_64.rpm | 21 kB 00:00:00
(9/34): libconfig-1.4.9-5.el7.x86_64.rpm | 59 kB 00:00:00
(10/34): librabbitmq-0.8.0-2.el7.x86_64.rpm | 37 kB 00:00:00
(11/34): libcephfs2-14.2.4-0.el7.x86_64.rpm | 480 kB 00:00:00
(12/34): librados2-14.2.4-0.el7.x86_64.rpm | 3.3 MB 00:00:05
(13/34): libradosstriper1-14.2.4-0.el7.x86_64.rpm | 342 kB 00:00:00
(14/34): librdmacm-22.1-3.el7.x86_64.rpm | 63 kB 00:00:00
(15/34): liboath-2.6.2-1.el7.x86_64.rpm | 51 kB 00:00:07
(16/34): librbd1-14.2.4-0.el7.x86_64.rpm | 1.6 MB 00:00:01
(17/34): libstoragemgmt-python-1.7.3-3.el7.noarch.rpm | 167 kB 00:00:00
(18/34): libstoragemgmt-1.7.3-3.el7.x86_64.rpm | 243 kB 00:00:00
(19/34): libstoragemgmt-python-clibs-1.7.3-3.el7.x86_64.rpm | 19 kB 00:00:00
(20/34): librgw2-14.2.4-0.el7.x86_64.rpm | 4.6 MB 00:00:02
(21/34): python-ceph-argparse-14.2.4-0.el7.x86_64.rpm | 36 kB 00:00:00
(22/34): python-ply-3.4-11.el7.noarch.rpm | 123 kB 00:00:00
(23/34): python-cffi-1.6.0-5.el7.x86_64.rpm | 218 kB 00:00:00
(24/34): python-cephfs-14.2.4-0.el7.x86_64.rpm | 91 kB 00:00:00
(25/34): python-pycparser-2.14-1.el7.noarch.rpm | 104 kB 00:00:00
(26/34): python-rados-14.2.4-0.el7.x86_64.rpm | 190 kB 00:00:00
(27/34): python-rbd-14.2.4-0.el7.x86_64.rpm | 171 kB 00:00:00
(28/34): python2-six-1.9.0-0.el7.noarch.rpm | 2.9 kB 00:00:00
(29/34): python2-bcrypt-3.1.6-2.el7.x86_64.rpm | 39 kB 00:00:00
(30/34): python-rgw-14.2.4-0.el7.x86_64.rpm | 76 kB 00:00:00
(31/34): selinux-policy-3.13.1-252.el7.1.noarch.rpm | 492 kB 00:00:00
(32/34): yajl-2.0.4-4.el7.x86_64.rpm | 39 kB 00:00:00
(33/34): selinux-policy-targeted-3.13.1-252.el7.1.noarch.rpm | 7.0 MB 00:00:02
(34/34): ceph-base-14.2.4-0.el7.x86_64.rpm | 5.4 MB 00:01:13
---------------------------------------------------------------------------------------------------------------------------------------------------------------------------------------------------------------------------------------------
Total 1.0 MB/s | 72 MB 00:01:13
Running transaction check
Running transaction test
Transaction test succeeded
Running transaction
Installing : librdmacm-22.1-3.el7.x86_64 1/53
Updating : 2:librados2-14.2.4-0.el7.x86_64 2/53
Updating : 2:python-rados-14.2.4-0.el7.x86_64 3/53
Installing : liboath-2.6.2-1.el7.x86_64 4/53
Updating : 2:librbd1-14.2.4-0.el7.x86_64 5/53
Updating : 2:libcephfs2-14.2.4-0.el7.x86_64 6/53
Installing : librabbitmq-0.8.0-2.el7.x86_64 7/53
Updating : 2:librgw2-14.2.4-0.el7.x86_64 8/53
Installing : 2:python-ceph-argparse-14.2.4-0.el7.x86_64 9/53
Installing : yajl-2.0.4-4.el7.x86_64 10/53
Updating : 2:python-cephfs-14.2.4-0.el7.x86_64 11/53
Updating : 2:python-rgw-14.2.4-0.el7.x86_64 12/53
Updating : 2:python-rbd-14.2.4-0.el7.x86_64 13/53
Updating : 2:libradosstriper1-14.2.4-0.el7.x86_64 14/53
Updating : 2:ceph-common-14.2.4-0.el7.x86_64 15/53
Updating : selinux-policy-3.13.1-252.el7.1.noarch 16/53
Updating : selinux-policy-targeted-3.13.1-252.el7.1.noarch 17/53
Updating : 2:ceph-base-14.2.4-0.el7.x86_64 18/53
Updating : 2:ceph-selinux-14.2.4-0.el7.x86_64 19/53
Updating : 2:ceph-mds-14.2.4-0.el7.x86_64 20/53
Updating : 2:ceph-mon-14.2.4-0.el7.x86_64 21/53
Installing : libconfig-1.4.9-5.el7.x86_64 22/53
Installing : libstoragemgmt-1.7.3-3.el7.x86_64 23/53
Installing : libstoragemgmt-python-clibs-1.7.3-3.el7.x86_64 24/53
Installing : libstoragemgmt-python-1.7.3-3.el7.noarch 25/53
Updating : 2:ceph-osd-14.2.4-0.el7.x86_64 26/53
Installing : python-ply-3.4-11.el7.noarch 27/53
Installing : python-pycparser-2.14-1.el7.noarch 28/53
Installing : python-cffi-1.6.0-5.el7.x86_64 29/53
Installing : python2-six-1.9.0-0.el7.noarch 30/53
Installing : python2-bcrypt-3.1.6-2.el7.x86_64 31/53
Updating : 2:ceph-mgr-14.2.4-0.el7.x86_64 32/53
Installing : 2:ceph-14.2.4-0.el7.x86_64 33/53
Updating : 2:ceph-radosgw-14.2.4-0.el7.x86_64 34/53
Cleanup : 2:ceph-radosgw-12.2.12-0.el7.x86_64 35/53
Cleanup : 2:ceph-mon-12.2.12-0.el7.x86_64 36/53
Cleanup : 2:ceph-osd-12.2.12-0.el7.x86_64 37/53
Cleanup : 2:ceph-mds-12.2.12-0.el7.x86_64 38/53
Cleanup : 2:ceph-mgr-12.2.12-0.el7.x86_64 39/53
Cleanup : 2:ceph-selinux-12.2.12-0.el7.x86_64 40/53
Cleanup : 2:ceph-base-12.2.12-0.el7.x86_64 41/53
Cleanup : selinux-policy-targeted-3.13.1-229.el7.noarch 42/53
Cleanup : 2:ceph-common-12.2.12-0.el7.x86_64 43/53
Cleanup : selinux-policy-3.13.1-229.el7.noarch 44/53
Cleanup : 2:python-rbd-12.2.12-0.el7.x86_64 45/53
Cleanup : 2:python-rgw-12.2.12-0.el7.x86_64 46/53
Cleanup : 2:librgw2-12.2.12-0.el7.x86_64 47/53
Cleanup : 2:python-rados-12.2.12-0.el7.x86_64 48/53
Cleanup : 2:librbd1-12.2.12-0.el7.x86_64 49/53
Cleanup : 2:libradosstriper1-12.2.12-0.el7.x86_64 50/53
Cleanup : 2:python-cephfs-12.2.12-0.el7.x86_64 51/53
Cleanup : 2:libcephfs2-12.2.12-0.el7.x86_64 52/53
Cleanup : 2:librados2-12.2.12-0.el7.x86_64 53/53
Verifying : 2:librados2-14.2.4-0.el7.x86_64 1/53
Verifying : liboath-2.6.2-1.el7.x86_64 2/53
Verifying : 2:python-rgw-14.2.4-0.el7.x86_64 3/53
Verifying : python2-six-1.9.0-0.el7.noarch 4/53
Verifying : 2:ceph-14.2.4-0.el7.x86_64 5/53
Verifying : 2:ceph-mgr-14.2.4-0.el7.x86_64 6/53
Verifying : python2-bcrypt-3.1.6-2.el7.x86_64 7/53
Verifying : 2:ceph-osd-14.2.4-0.el7.x86_64 8/53
Verifying : libstoragemgmt-python-clibs-1.7.3-3.el7.x86_64 9/53
Verifying : 2:ceph-base-14.2.4-0.el7.x86_64 10/53
Verifying : 2:ceph-common-14.2.4-0.el7.x86_64 11/53
Verifying : 2:libradosstriper1-14.2.4-0.el7.x86_64 12/53
Verifying : 2:python-rados-14.2.4-0.el7.x86_64 13/53
Verifying : 2:librbd1-14.2.4-0.el7.x86_64 14/53
Verifying : librdmacm-22.1-3.el7.x86_64 15/53
Verifying : libstoragemgmt-python-1.7.3-3.el7.noarch 16/53
Verifying : 2:ceph-mds-14.2.4-0.el7.x86_64 17/53
Verifying : python-ply-3.4-11.el7.noarch 18/53
Verifying : 2:libcephfs2-14.2.4-0.el7.x86_64 19/53
Verifying : libconfig-1.4.9-5.el7.x86_64 20/53
Verifying : 2:ceph-selinux-14.2.4-0.el7.x86_64 21/53
Verifying : 2:ceph-radosgw-14.2.4-0.el7.x86_64 22/53
Verifying : selinux-policy-targeted-3.13.1-252.el7.1.noarch 23/53
Verifying : 2:ceph-mon-14.2.4-0.el7.x86_64 24/53
Verifying : yajl-2.0.4-4.el7.x86_64 25/53
Verifying : 2:librgw2-14.2.4-0.el7.x86_64 26/53
Verifying : python-cffi-1.6.0-5.el7.x86_64 27/53
Verifying : python-pycparser-2.14-1.el7.noarch 28/53
Verifying : libstoragemgmt-1.7.3-3.el7.x86_64 29/53
Verifying : 2:python-rbd-14.2.4-0.el7.x86_64 30/53
Verifying : 2:python-cephfs-14.2.4-0.el7.x86_64 31/53
Verifying : selinux-policy-3.13.1-252.el7.1.noarch 32/53
Verifying : 2:python-ceph-argparse-14.2.4-0.el7.x86_64 33/53
Verifying : librabbitmq-0.8.0-2.el7.x86_64 34/53
Verifying : selinux-policy-targeted-3.13.1-229.el7.noarch 35/53
Verifying : 2:ceph-mgr-12.2.12-0.el7.x86_64 36/53
Verifying : 2:ceph-osd-12.2.12-0.el7.x86_64 37/53
Verifying : selinux-policy-3.13.1-229.el7.noarch 38/53
Verifying : 2:ceph-base-12.2.12-0.el7.x86_64 39/53
Verifying : 2:python-rados-12.2.12-0.el7.x86_64 40/53
Verifying : 2:python-cephfs-12.2.12-0.el7.x86_64 41/53
Verifying : 2:ceph-common-12.2.12-0.el7.x86_64 42/53
Verifying : 2:ceph-mon-12.2.12-0.el7.x86_64 43/53
Verifying : 2:libradosstriper1-12.2.12-0.el7.x86_64 44/53
Verifying : 2:libcephfs2-12.2.12-0.el7.x86_64 45/53
Verifying : 2:python-rbd-12.2.12-0.el7.x86_64 46/53
Verifying : 2:librbd1-12.2.12-0.el7.x86_64 47/53
Verifying : 2:ceph-radosgw-12.2.12-0.el7.x86_64 48/53
Verifying : 2:ceph-mds-12.2.12-0.el7.x86_64 49/53
Verifying : 2:librgw2-12.2.12-0.el7.x86_64 50/53
Verifying : 2:ceph-selinux-12.2.12-0.el7.x86_64 51/53
Verifying : 2:python-rgw-12.2.12-0.el7.x86_64 52/53
Verifying : 2:librados2-12.2.12-0.el7.x86_64 53/53

Installed:
ceph.x86_64 2:14.2.4-0.el7

Dependency Installed:
libconfig.x86_64 0:1.4.9-5.el7 liboath.x86_64 0:2.6.2-1.el7 librabbitmq.x86_64 0:0.8.0-2.el7 librdmacm.x86_64 0:22.1-3.el7 libstoragemgmt.x86_64 0:1.7.3-3.el7
libstoragemgmt-python.noarch 0:1.7.3-3.el7 libstoragemgmt-python-clibs.x86_64 0:1.7.3-3.el7 python-ceph-argparse.x86_64 2:14.2.4-0.el7 python-cffi.x86_64 0:1.6.0-5.el7 python-ply.noarch 0:3.4-11.el7
python-pycparser.noarch 0:2.14-1.el7 python2-bcrypt.x86_64 0:3.1.6-2.el7 python2-six.noarch 0:1.9.0-0.el7 yajl.x86_64 0:2.0.4-4.el7

Dependency Updated:
ceph-base.x86_64 2:14.2.4-0.el7 ceph-common.x86_64 2:14.2.4-0.el7 ceph-mds.x86_64 2:14.2.4-0.el7 ceph-mgr.x86_64 2:14.2.4-0.el7 ceph-mon.x86_64 2:14.2.4-0.el7 ceph-osd.x86_64 2:14.2.4-0.el7
ceph-radosgw.x86_64 2:14.2.4-0.el7 ceph-selinux.x86_64 2:14.2.4-0.el7 libcephfs2.x86_64 2:14.2.4-0.el7 librados2.x86_64 2:14.2.4-0.el7 libradosstriper1.x86_64 2:14.2.4-0.el7 librbd1.x86_64 2:14.2.4-0.el7
librgw2.x86_64 2:14.2.4-0.el7 python-cephfs.x86_64 2:14.2.4-0.el7 python-rados.x86_64 2:14.2.4-0.el7 python-rbd.x86_64 2:14.2.4-0.el7 python-rgw.x86_64 2:14.2.4-0.el7 selinux-policy.noarch 0:3.13.1-252.el7.1
selinux-policy-targeted.noarch 0:3.13.1-252.el7.1

Complete!

5、检查更新后的rpm packages

1
2
3
4
5
6
7
8
9
10
11
12
13
14
15
16
17
18
19
20
21
22
23
[root@ceph2 ~]# rpm -qa | grep ceph
python-ceph-argparse-14.2.4-0.el7.x86_64
ceph-mon-14.2.4-0.el7.x86_64
ceph-14.2.4-0.el7.x86_64
libcephfs2-14.2.4-0.el7.x86_64
ceph-base-14.2.4-0.el7.x86_64
ceph-mds-14.2.4-0.el7.x86_64
ceph-osd-14.2.4-0.el7.x86_64
ceph-mgr-14.2.4-0.el7.x86_64
ceph-radosgw-14.2.4-0.el7.x86_64
python-cephfs-14.2.4-0.el7.x86_64
ceph-common-14.2.4-0.el7.x86_64
ceph-selinux-14.2.4-0.el7.x86_64

[root@ceph2 ~]# rpm -qa | grep rbd
librbd1-14.2.4-0.el7.x86_64
python-rbd-14.2.4-0.el7.x86_64

[root@ceph2 ~]# rpm -qa | grep rados
librados2-14.2.4-0.el7.x86_64
libradosstriper1-14.2.4-0.el7.x86_64
ceph-radosgw-14.2.4-0.el7.x86_64
python-rados-14.2.4-0.el7.x86_64

6、重启服务每台ceph节点的ceph service并检查service状态

重启顺序

1
2
3
4
5
1、Ceph Monitors
2、Ceph Mgr
3、Ceph OSD Daemons
4、Ceph Metadata Servers
5、Ceph Object Gateways

重启命令

1
2
3
4
5
6
7
8
9
10
11
12
13
14
15
16
17
18
19
20
21
22
23
24
25
26
27
28
29
30
31
32
33
34
35
36
37
38
39
40
41
42
43
44
45
46
47
48
49
50
51
52
53
54
55
56
57
58
59
60
61
62
63
# 重启Ceph Monitors
[root@ceph2 ~]# systemctl restart ceph-mon@ceph2.service
[root@ceph2 ~]# ceph mon stat
e1: 3 mons at {ceph1=10.20.10.8:6789/0,ceph2=10.20.10.21:6789/0,ceph3=10.20.10.15:6789/0}, election epoch 6, leader 0 ceph1, quorum 0,1,2 ceph1,ceph3,ceph2

# 重启Ceph Mgr
[root@ceph2 ~]# systemctl restart ceph-mgr@ceph2.service
[root@ceph2 ~]# ceph -s
cluster:
id: c4051efa-1997-43ef-8497-fb02bdf08233
health: HEALTH_WARN
insufficient standby MDS daemons available
noout flag(s) set

services:
mon: 3 daemons, quorum ceph1,ceph3,ceph2
mgr: ceph1(active), standbys: ceph3, ceph2
mds: cephfs-1/1/1 up {0=ceph2=up:active}
osd: 6 osds: 6 up, 6 in
flags noout
rgw: 2 daemons active

data:
pools: 7 pools, 176 pgs
objects: 245 objects, 5.30KiB
usage: 6.05GiB used, 293GiB / 299GiB avail
pgs: 176 active+clean

# 重启Ceph OSD Daemons
[root@ceph2 ~]# systemctl restart ceph-osd@2.service && systemctl restart ceph-osd@5.service && ceph osd stat
6 osds: 5 up, 6 in
[root@ceph2 ~]# ceph osd stat
6 osds: 6 up, 6 in

# 重启Ceph Metadata Servers
[root@ceph2 ~]# systemctl restart ceph-mds@ceph2.service
[root@ceph2 ~]# ceph mds stat
cephfs-1/1/1 up {0=ceph2=up:reconnect}, 1 up:standby
[root@ceph2 ~]# ceph mds stat
cephfs-1/1/1 up {0=ceph2=up:active}, 1 up:standby

# 重启Ceph Object Gateways
[root@ceph2 ~]# systemctl restart ceph-radosgw@rgw.ceph2.service
[root@ceph2 ~]# ceph -s
cluster:
id: c4051efa-1997-43ef-8497-fb02bdf08233
health: HEALTH_WARN
insufficient standby MDS daemons available
noout flag(s) set

services:
mon: 3 daemons, quorum ceph1,ceph3,ceph2
mgr: ceph1(active), standbys: ceph3, ceph2
mds: cephfs-1/1/1 up {0=ceph2=up:active}
osd: 6 osds: 6 up, 6 in
flags noout
rgw: 2 daemons active

data:
pools: 7 pools, 176 pgs
objects: 245 objects, 5.30KiB
usage: 6.05GiB used, 293GiB / 299GiB avail
pgs: 176 active+clean

注意:当集群升级过程中,刚刚升级第一个MDS会出现insufficient standby MDS daemons available,当升级第二个MDS后,警告会自动消失。

7、警告解除Legacy BlueStore stats reporting detected on 6 OSD(s)

首先确认集群状态,无其他异常告警,并修复。

1
2
3
4
5
6
7
8
9
10
11
12
13
14
15
16
17
18
19
20
21
22
23
24
25
[root@ceph1 ~]# ceph -s
cluster:
id: c4051efa-1997-43ef-8497-fb02bdf08233
health: HEALTH_WARN
noout flag(s) set
Legacy BlueStore stats reporting detected on 6 OSD(s)

services:
mon: 3 daemons, quorum ceph1,ceph3,ceph2 (age 111s)
mgr: ceph2(active, since 6h), standbys: ceph3, ceph1
mds: cephfs:1 {0=ceph2=up:active} 2 up:standby
osd: 6 osds: 6 up, 6 in
flags noout
rgw: 3 daemons active (ceph1, ceph2, ceph3)

data:
pools: 7 pools, 176 pgs
objects: 245 objects, 5.8 KiB
usage: 6.1 GiB used, 293 GiB / 299 GiB avail
pgs: 176 active+clean

[root@ceph1 ~]# systemctl stop ceph-osd@1.service
[root@ceph1 ~]# ceph-bluestore-tool repair --path /var/lib/ceph/osd/ceph-1/
repair success
[root@ceph1 ~]# systemctl start ceph-osd@1.service

当前出现问题:https://tracker.ceph.com/issues/42297,正在与社区沟通

相关ceph users

1
2
3
http://lists.ceph.com/pipermail/ceph-users-ceph.com/2019-July/035889.html
http://lists.ceph.com/pipermail/ceph-users-ceph.com/2019-July/036010.html
http://lists.ceph.com/pipermail/ceph-users-ceph.com/2019-July/036002.html

8、告警解除3 monitors have not enabled msgr2(nautilus版本中mon需要打开v2,监听3300端口),关于msgr2参见http://lnsyyj.github.io/2019/10/14/Ceph-MESSENGER-V2/

1
[root@ceph1 ~]# ceph mon enable-msgr2

9、解除noout标志

1
[root@ceph2 ~]# ceph osd unset noout

10、确认ceph状态

1
2
3
4
5
6
7
8
9
10
11
12
13
14
15
16
17
[root@ceph2 ~]# ceph -s
cluster:
id: c4051efa-1997-43ef-8497-fb02bdf08233
health: HEALTH_OK

services:
mon: 3 daemons, quorum ceph1,ceph3,ceph2 (age 30m)
mgr: ceph2(active, since 7h), standbys: ceph3, ceph1
mds: cephfs:1 {0=ceph2=up:active} 2 up:standby
osd: 6 osds: 6 up, 6 in
rgw: 3 daemons active (ceph1, ceph2, ceph3)

data:
pools: 7 pools, 176 pgs
objects: 245 objects, 5.8 KiB
usage: 6.1 GiB used, 293 GiB / 299 GiB avail
pgs: 176 active+clean

升级Ceph客户端package

升级可能带来的影响

1
2
(1)客户端升级可能会影响客户业务,导致业务中断一定时间。
(2)可能带来客户端程序不兼容ceph client package的情况。

1、升级package

1
[root@ceph1 ~]# yum install ceph-common librados2 librbd1 python-rbd python-rados -y

2、确认升级后的版本

1
ceph --version

iSCSI gateway将Ceph Storage与iSCSI标准集成在一起,将RADOS Block Device(RBD)images导出为SCSI disks高可用(HA)iSCSI target。iSCSI协议允许客户端(initiators)通过TCP / IP网络将SCSI命令发送到SCSI storage devices(targets)。这允许异构客户端(例如Microsoft Windows)访问Ceph存储群集。

每个iSCSI gateway都运行Linux IO target kernel subsystem(LIO)以提供iSCSI协议支持。LIO利用userspace直通(TCMU)Ceph的librbd库进行交互,并将RBD images公开给iSCSI客户端。借助Ceph的iSCSI gateway,您可以有效地运行完整的block-storage infrastructure,并具有传统Storage Area Network (SAN) 的所有功能和优势。

Requirements

要实现Ceph iSCSI gateway,有一些要求。对于高可用的Ceph iSCSI gateway解决方案,建议使用2到4个iSCSI gateway节点。

有关硬件建议,请参阅Hardware Recommendation page获取更多详细信息。

1
注意 在iSCSI gateway节点上,RBD images的内存占用量可能会增大。根据映射(mapped)的RBD images的数量,相应地计划内存需求。

Ceph Monitors或OSD没有特定的iSCSI gateway选项,但是降低默认timers以检测OSD至关重要,它可以降低initiator超时的可能性,这一点很重要。建议为存储集群中的每个OSD节点使用以下配置选项:

1
2
3
[osd]
osd heartbeat grace = 20
osd heartbeat interval = 5
  • Ceph Monitor的在线更新
1
2
3
4
ceph tell <daemon_type>.<id> config set <parameter_name> <new_value>

ceph tell osd.0 config set osd_heartbeat_grace 20
ceph tell osd.0 config set osd_heartbeat_interval 5
  • OSD节点的在线更新
1
2
3
4
ceph daemon <daemon_type>.<id> config set osd_client_watch_timeout 15

ceph daemon osd.0 config set osd_heartbeat_grace 20
ceph daemon osd.0 config set osd_heartbeat_interval 5

有关设置Ceph的配置选项的更多详细信息,请参阅Configuration page

Configuring the iSCSI Target

传统上,对Ceph存储集群的块级访问仅限于QEMU和librbd,这是在OpenStack环境中采用的关键因素。从Ceph Luminous版本开始,块级访问正在扩展,以提供标准的iSCSI支持,从而允许更广泛的平台使用,并有可能打开新的用例。

  • Red Hat Enterprise Linux/CentOS 7.5(或更高版本);Linux内核v4.16(或更高版本)
  • 使用ceph-ansible或使用command-line interface部署的有效Ceph Storage集群
  • iSCSI gateways nodes,可以与OSD nodes同一节点,也可以使用专用节点上
  • iSCSI front-end traffic和Ceph back-end traffic使用单独的网络

安装和配置 Ceph iSCSI gateway的方法:

Configuring the iSCSI Initiators

1
警告:通过多个iSCSI网关导出RBD image时,不支持使用SCSI persistent group reservations(PGR)和基于SCSI 2 reservations的应用程序。

Monitoring the iSCSI Gateways

Ceph为iSCSI gateway环境提供了一个附加工具,以监视导出的RADOS Block Device(RBD)images的性能。

该gwtop工具是一个类似top的工具,用于显示通过iSCSI导出到客户端的RBD images的聚合性能指标。这些指标来自Performance Metrics Domain Agent(PMDA)。来自Linux-IO target(LIO)PMDA的信息用于列出每个已导出的RBD images以及所连接的客户端及其关联的I / O指标。

Requirements

  • 正在运行的Ceph iSCSI gateway

Installing

1、在每个iSCSI gateway节点安装ceph-iscsi-tools

1
yum install ceph-iscsi-tools

2、在每个iSCSI gateway节点安装performance co-pilot

1
yum install pcp

3、在每个iSCSI gateway节点安装LIO PMDA

1
yum install pcp-pmda-lio

4、在每个iSCSI gateway节点enable并start performance co-pilot service

1
2
# systemctl enable pmcd
# systemctl start pmcd

5、注册pcp-pmda-lio agent

1
2
cd /var/lib/pcp/pmdas/lio
./Install

默认情况下,gwtop假定iSCSI gateway configuration object被存储在rbd pool被叫做gateway.conf的RADOS object中。此configuration定义了需要收集性能信息的iSCSI gateways。可以使用-g-c标志将其覆盖 。gwtop –help获取更多详细信息。

LIO configuration确定要从performance co-pilot提取性能统计信息的类型。当gwtop启动时,它着眼于LIO configuration,如果发现user-space的磁盘,然后gwtop 自动选择LIO收集器。

Example gwtop Outputs

1
2
3
4
5
6
7
8
9
10
11
gwtop  2/2 Gateways   CPU% MIN:  4 MAX:  5    Network Total In:    2M  Out:    3M   10:20:00
Capacity: 8G Disks: 8 IOPS: 503 Clients: 1 Ceph: HEALTH_OK OSDs: 3
Pool.Image Src Size iops rMB/s wMB/s Client
iscsi.t1703 500M 0 0.00 0.00
iscsi.testme1 500M 0 0.00 0.00
iscsi.testme2 500M 0 0.00 0.00
iscsi.testme3 500M 0 0.00 0.00
iscsi.testme5 500M 0 0.00 0.00
rbd.myhost_1 T 4G 504 1.95 0.00 rh460p(CON)
rbd.test_2 1G 0 0.00 0.00
rbd.testme 500M 0 0.00 0.00

Client column,(CON)表示iSCSI initiator (client)当前已登录到iSCSI gateway。如果显示-multi-,则表示多个clients映射到单个RBD image。

安装编译依赖

1
yum install gcc rpm-build libibverbs-devel librdmacm-devel libaio-devel docbook-style-xsl -y

1
2
3
4
5
6
7
8
9
10
11
12
13
14
15
16
17
18
19
20
21
22
23
24
25
26
27
28
[root@dev tgt]# tree scripts/
scripts/
├── build-pkg.sh #build rpm或deb包
├── checkarch.sh #
├── checkpatch.pl #
├── deb
│   ├── changelog
│   ├── compat
│   ├── control
│   ├── copyright
│   ├── init
│   ├── patches
│   │   └── 0001-Use-local-docbook-for-generating-docs.patch
│   ├── rules
│   ├── source
│   │   └── format
│   └── tgt.bash-completion
├── initd.sample
├── Makefile
├── tgt-admin
├── tgt.bashcomp.sh
├── tgt-core-test
├── tgtd.service
├── tgtd.spec
└── tgt-setup-lun

3 directories, 20 files

Logstash

Logstash是开源的服务器端数据处理管道,能够同时从多个来源采集数据,转换数据,然后将数据发送到您最喜欢的“存储库”中。(我们的存储库是Elasticsearch)

Logstash部署安装

1
2
3
4
5
6
7
8
# 检查jdk环境,要就jdk1.8+
java -version

# 解压安装包
tar zxvf logstash-6.5.4.tar.gz

# 第一个logstash示例
bin/logstash -e 'input { stdin { } } output { stdout { } }'

测试

1
2
3
4
5
6
7
8
[root@dev ~]# /usr/share/logstash/bin/logstash -e 'input { stdin { } } output { stdout { } }'
hello
{
"message" => "hello",
"@version" => "1",
"@timestamp" => 2019-09-19T02:29:59.833Z,
"host" => "dev"
}

配置

Logstash的配置有三部分组成:

1
2
3
4
5
6
7
8
9
10
11
input {	# 输入
stdin { ... } #标准输入
}

filter { # 过滤,对数据进行分割、截取等处理
...
}

output { # 输出
stdout { ... } #标准输出
}
  • 输入

    采集各种样式、大小和来源的数据

  • 过滤

    实时解析和转换数据

  • 输出

    选择您的存储库,导出您的数据

读取自定义日志

如果是自定义结构的日志,这个时候就需要Logstash处理后才能使用。

1
2
3
4
5
6
7
8
9
10
11
12
13
14
15
16
17
18
19
20
21
22
23
24
25
26
27
28
29
30
31
32
33
34
35
36
# Logstash配置文件,规则定义
[root@dev conf.d]# cat 99-test-yujiang.conf
input {
file {
path => "/var/log/yujiang.log"
start_position => "beginning"
}
}
filter {
mutate {
split => { "message"=>"|" }
}
}
output {
stdout { codec => rubydebug}
}


# 启动Logstash,等待自定义日志文件写入数据
[root@dev conf.d]# /usr/share/logstash/bin/logstash -f /etc/logstash/conf.d/99-test-yujiang.conf
{
"@version" => "1",
"message" => [
[0] "2019-09-19 11:20",
[1] "ERROR",
[2] "hello world"
],
"@timestamp" => 2019-09-19T03:20:21.116Z,
"path" => "/var/log/yujiang.log",
"host" => "dev"
}


# 向自定义日志文件中写入数据
[root@dev log]# echo "2019-09-19 11:20|ERROR|hello world" >> yujiang.log

将自定义日志写入Elasticsearch

1
2
3
4
5
6
7
8
9
10
11
12
13
14
15
16
17
18
19
20
21
22
23
24
25
26
27
28
29
30
31
32
33
34
35
36
37
38
39
40
# Logstash配置文件,规则定义
[root@dev conf.d]# cat 99-test-yujiang.conf
input {
file {
path => "/var/log/yujiang.log"
start_position => "beginning"
}
}
filter {
mutate {
split => { "message"=>"|" }
}
}
output {
elasticsearch {
hosts => [ "192.168.56.101:9200" ]
}
}


# 在Elasticsearch-head中查看
{
"_index": "logstash-2019.09.19",
"_type": "doc",
"_id": "ZNuTR20BQ8jxL59AtKFm",
"_version": 1,
"_score": 1,
"_source": {
"message": [
"2019-09-19 11:20",
"ERROR",
"hello world"
],
"@timestamp": "2019-09-19T03:32:04.502Z",
"@version": "1",
"path": "/var/log/yujiang.log",
"host": "dev"
}
}

ELK是Elasticsearch、Logstash、Kibana的简称,这三者是核心套件,并不是全部。一般用于集中搜集并展示日志。

filebeat

filebeat的主要作用是采集日志文件,是轻量级的日志采集器。部署filebeat非常简单,这里就不做介绍了。我们来看一下filebeat的配置与使用。

简单配置及演示:

​ 这里我们先看一下filebeat.inputs类型为stdin,output.console方式。启动filebeat后,它会从标准输入接收数据,并以JSON格式打印在控制台中。

1
2
3
4
5
6
7
8
9
10
11
12
13
14
15
16
17
18
19
20
21
22
23
24
25
26
27
28
29
30
31
32
33
34
35
36
37
38
39
40
41
42
43
44
[root@dev filebeat]# cat /etc/filebeat/test_stdin.yml 
filebeat.inputs: # filebeat输入配置
- type: stdin # stdin表示标准输入
enabled: true # 用于启用或禁用模块
output.console: # Console output
enabled: true # 用于启用或禁用模块
codec.json: # 配置JSON编码
pretty: true # Pretty-print JSON event
escape_html: true # 在字符串中配置转义HTML symbols


[root@dev filebeat]# filebeat -e -c test_stdin.yml
hello yujiang # 在控制台输入
{
"@timestamp": "2019-09-17T09:01:00.251Z",
"@metadata": { # 元数据
"beat": "filebeat",
"type": "doc",
"version": "6.8.3"
},
"offset": 0,
"log": {
"file": {
"path": ""
}
},
"prospector": { # 标准输入勘探器
"type": "stdin"
},
"input": { # 控制台标准输入
"type": "stdin"
},
"beat": { # beat版本以及hostname
"name": "dev",
"hostname": "dev",
"version": "6.8.3"
},
"host": {
"name": "dev"
},
"message": "hello yujiang", # 输入的内容
"source": ""
}

日志文件配置及演示

1
2
3
4
5
6
7
8
9
10
11
12
13
14
15
16
17
18
19
20
21
22
23
24
25
26
27
28
29
30
31
32
33
34
35
36
37
38
39
40
41
42
43
44
45
46
47
48
49
50
51
52
53
[root@dev filebeat]# cat test_log.yml 
filebeat.inputs: # filebeat输入配置
- type: log # log表示收集日志文件
enabled: true # 用于启用或禁用模块
paths: # 日志文件位置
- /var/log/yujiang.log
output.console: # Console output
enabled: true # 用于启用或禁用模块
codec.json: # 配置JSON编码
pretty: true # Pretty-print JSON event
escape_html: true # 在字符串中配置转义HTML symbols


# 启动filebeat,这时开启另一个终端,向/var/log/yujiang.log文件中写入hello world
[root@dev filebeat]# filebeat -e -c ./test_log.yml
2019-09-17T05:27:25.513-0400 INFO crawler/crawler.go:106 Loading and starting Inputs completed. Enabled inputs: 1
2019-09-17T05:28:55.525-0400 INFO log/harvester.go:255 Harvester started for file: /var/log/yujiang.log
{
"@timestamp": "2019-09-17T09:28:55.525Z",
"@metadata": {
"beat": "filebeat",
"type": "doc",
"version": "6.8.3"
},
"beat": {
"version": "6.8.3",
"name": "dev",
"hostname": "dev"
},
"host": {
"name": "dev"
},
"offset": 0,
"log": {
"file": {
"path": "/var/log/yujiang.log"
}
},
"message": "hello world",
"source": "/var/log/yujiang.log",
"prospector": {
"type": "log"
},
"input": {
"type": "log"
}
}


# 向/var/log/yujiang.log文件中写入hello world
[root@dev log]# echo "hello world" >> yujiang.log

自定义tags配置及演示

1
2
3
4
5
6
7
8
9
10
11
12
13
14
15
16
17
18
19
20
21
22
23
24
25
26
27
28
29
30
31
32
33
34
35
36
37
38
39
40
41
42
43
44
45
46
47
48
49
50
51
52
53
54
55
56
[root@dev filebeat]# cat test_log_tags.yml 
filebeat.inputs: # filebeat输入配置
- type: log # log表示收集日志文件
enabled: true # 用于启用或禁用模块
paths: # 日志文件位置
- /var/log/yujiang.log
tags: ["web", "ceph"] # 自定义tags
output.console: # Console output
enabled: true # 用于启用或禁用模块
codec.json: # 配置JSON编码
pretty: true # Pretty-print JSON event
escape_html: true # 在字符串中配置转义HTML symbols


# 启动filebeat,这时开启另一个终端,向/var/log/yujiang.log文件中写入hello tags
[root@dev filebeat]# filebeat -e -c ./test_log_tags.yml
{
"@timestamp": "2019-09-17T09:55:43.909Z",
"@metadata": {
"beat": "filebeat",
"type": "doc",
"version": "6.8.3"
},
"source": "/var/log/yujiang.log",
"offset": 12,
"beat": {
"name": "dev",
"hostname": "dev",
"version": "6.8.3"
},
"message": "hello tags",
"log": {
"file": {
"path": "/var/log/yujiang.log"
}
},
"tags": [ # 自定义tags
"web",
"ceph"
],
"prospector": {
"type": "log"
},
"input": {
"type": "log"
},
"host": {
"name": "dev"
}
}


# 向/var/log/yujiang.log文件中写入hello world
[root@dev log]# echo "hello tags" >> yujiang.log

自定义字段配置及演示

from添加到子节点

1
2
3
4
5
6
7
8
9
10
11
12
13
14
15
16
17
18
19
20
21
22
23
24
25
26
27
28
29
30
31
32
33
34
35
36
37
38
39
40
41
42
43
44
45
46
47
48
49
50
51
52
53
54
55
56
57
58
59
[root@dev filebeat]# cat test_log_tags_fields.yml
filebeat.inputs: # filebeat输入配置
- type: log # log表示收集日志文件
enabled: true # 用于启用或禁用模块
paths: # 日志文件位置
- /var/log/yujiang.log
tags: ["web", "ceph"] # 添加自定义tags
fields: # 添加自定义字段
from: test-web-ceph
output.console: # Console output
enabled: true # 用于启用或禁用模块
codec.json: # 配置JSON编码
pretty: true # Pretty-print JSON event
escape_html: true # 在字符串中配置转义HTML symbols


[root@dev filebeat]# filebeat -e -c test_log_tags_fields.yml
{
"@timestamp": "2019-09-17T10:14:23.323Z",
"@metadata": {
"beat": "filebeat",
"type": "doc",
"version": "6.8.3"
},
"source": "/var/log/yujiang.log",
"tags": [
"web",
"ceph"
],
"input": {
"type": "log"
},
"offset": 23,
"message": "hello tags fields",
"prospector": {
"type": "log"
},
"beat": {
"hostname": "dev",
"version": "6.8.3",
"name": "dev"
},
"host": {
"name": "dev"
},
"log": {
"file": {
"path": "/var/log/yujiang.log"
}
},
"fields": {
"from": "test-web-ceph"
}
}


[root@dev log]# echo "hello tags fields" >> yujiang.log

from添加到root节点

1
2
3
4
5
6
7
8
9
10
11
12
13
14
15
16
17
18
19
20
21
22
23
24
25
26
27
28
29
30
31
32
33
34
35
36
37
38
39
40
41
42
43
44
45
46
47
48
49
50
51
52
53
54
55
56
57
58
[root@dev filebeat]# cat test_log_tags_fields.yml 
filebeat.inputs: # filebeat输入配置
- type: log # log表示收集日志文件
enabled: true # 用于启用或禁用模块
paths: # 日志文件位置
- /var/log/yujiang.log
tags: ["web", "ceph"] # 添加自定义tags
fields: # 添加自定义字段
from: test-web-ceph
fields_under_root: true # true为添加到根节点,false为添加到子节点
output.console: # Console output
enabled: true # 用于启用或禁用模块
codec.json: # 配置JSON编码
pretty: true # Pretty-print JSON event
escape_html: true # 在字符串中配置转义HTML symbols


[root@dev filebeat]# filebeat -e -c test_log_tags_fields.yml
{
"@timestamp": "2019-09-17T10:25:29.414Z",
"@metadata": {
"beat": "filebeat",
"type": "doc",
"version": "6.8.3"
},
"offset": 77,
"tags": [
"web",
"ceph"
],
"prospector": {
"type": "log"
},
"input": {
"type": "log"
},
"from": "test-web-ceph", # from添加到root中
"beat": {
"version": "6.8.3",
"name": "dev",
"hostname": "dev"
},
"log": {
"file": {
"path": "/var/log/yujiang.log"
}
},
"message": "hello tags fields fields_under_root",
"source": "/var/log/yujiang.log",
"host": {
"name": "dev"
}
}


[root@dev log]# echo "hello tags fields fields_under_root" >> yujiang.log

对接elasticsearch配置及演示

日志内容输出到elasticsearch

1
2
3
4
5
6
7
8
9
10
11
12
13
14
15
16
17
18
19
20
21
22
23
24
25
26
27
28
[root@dev filebeat]# cat test_es.yml 
filebeat.inputs: # filebeat输入配置
- type: log # log表示收集日志文件
enabled: true # 用于启用或禁用模块
paths: # 日志文件位置
- /var/log/yujiang.log
tags: ["web", "ceph"] # 添加自定义tags
fields: # 添加自定义字段
from: test-web-ceph
fields_under_root: true # true为添加到根节点,false为添加到子节点
setup.template.settings:
index.number_of_shards: 3 #索引的分区数
output.elasticsearch:
hosts: ["192.168.56.101:9200"]


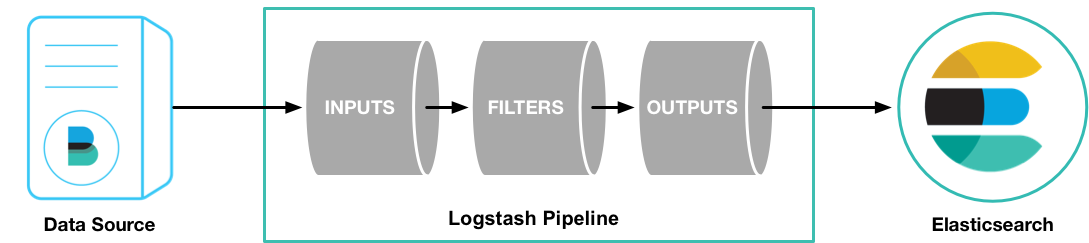
[root@dev filebeat]# filebeat -e -c test_es.yml
2019-09-17T23:10:34.272-0400 INFO log/harvester.go:255 Harvester started for file: /var/log/yujiang.log
2019-09-17T23:10:35.273-0400 INFO pipeline/output.go:95 Connecting to backoff(elasticsearch(http://192.168.56.101:9200))
2019-09-17T23:10:35.279-0400 INFO elasticsearch/client.go:739 Attempting to connect to Elasticsearch version 6.8.3
2019-09-17T23:10:35.379-0400 INFO template/load.go:128 Template already exists and will not be overwritten.
2019-09-17T23:10:35.379-0400 INFO instance/beat.go:889 Template successfully loaded.
2019-09-17T23:10:35.380-0400 INFO pipeline/output.go:105 Connection to backoff(elasticsearch(http://192.168.56.101:9200)) established


[root@dev log]# echo "hello" > yujiang.log

Filebeat工作原理

Filebeat主要由两个组件组成:prospector和harvester。

  • harvester

    • 负责读取单个文件的内容

    • 如果文件在读取时被删除或重命名,Filebeat将继续读取文件

  • prospector

    • 负责管理harvester并找到所有要读取的文件来源

    • 如果输入类型为日志,则查找器将查找路径匹配的所有文件,并为每个文件启动一个harvester

    • Filebeat目前支持两种prospector类型:log和stdin

  • Filebeat如何保持文件的状态

    • Filebeat保存每个文件的状态并将状态刷新到磁盘上的注册文件中

    • 该状态用于记住harvester正在读取的最后偏移量,并确保发送所有日志行

    • 如果输出(例如Elasticsearch或Logstash)无法访问,Filebeat会跟踪最后发送的行,并在输出再次可用时继续读取文件

    • 在Filebeat运行时,每个prospector内存中也会保存文件状态信息,当重新启动Filebeat时,将使用注册文件的数据来重建文件状态,Filebeat将每个harvester在从保存的最后偏移量继续读取

    • 文件状态记录在data/registry文件中

1
2
3
一般会保存在registry文件中,记录文件的偏移量
[root@dev filebeat]# cat /var/lib/filebeat/registry
[{"source":"/var/log/boot.log","offset":0,"timestamp":"2019-09-17T21:50:45.201469161-04:00","ttl":-2,"type":"log","meta":null,"FileStateOS":{"inode":134315203,"device":64768}},{"source":"/var/log/yum.log","offset":9899,"timestamp":"2019-09-17T21:50:45.160502101-04:00","ttl":-2,"type":"log","meta":null,"FileStateOS":{"inode":134315217,"device":64768}},{"source":"/var/log/yujiang.log","offset":12,"timestamp":"2019-09-17T23:15:39.385983011-04:00","ttl":-1,"type":"log","meta":null,"FileStateOS":{"inode":134836485,"device":64768}}]

启动参数说明

1
2
3
4
[root@dev filebeat]# filebeat -e -c test_es.yml -d "publish"
-e 输出到标准输出,默认输出到syslog和logs下
-c 指定配置文件
-d 输出debug信息

Filebeat Module

Filebeat中,有大量的Module,可以简化我们的配置,可直接使用。在filebeat.yml中必须配置filebeat.config.modules.path目录,否则会报错Error in modules manager: modules management requires 'filebeat.config.modules.path' setting

1
2
3
4
5
6
7
8
9
[root@dev filebeat]# cat /etc/filebeat/filebeat.yml 
# ......
filebeat.config:
modules:
enabled: true
path: /etc/filebeat/modules.d/*.yml
reload.enabled: true
reload.period: 10s
# ......

查看模块

1
2
3
4
5
6
7
8
9
10
11
12
13
14
15
16
17
18
19
20
21
22
23
24
[root@dev filebeat]# filebeat modules list
Enabled:
system

Disabled:
apache2
auditd
elasticsearch
haproxy
icinga
iis
iptables
kafka
kibana
logstash
mongodb
mysql
nginx
osquery
postgresql
redis
suricata
system
traefik

配置filebeat.yml

1
2
3
4
5
6
7
8
9
10
11
12
filebeat:

output:
elasticsearch:
hosts: ["localhost:9200"]

filebeat.config:
modules:
enabled: true
path: /etc/filebeat/modules.d/*.yml
reload.enabled: true
reload.period: 10s

1、查看当前版本kernel (Show current version of kernel)

1
2
[root@dev ~]# uname -r
3.10.0-957.el7.x86_64

2、导入公钥 (Import the public key)

1
[root@dev ~]# rpm --import https://www.elrepo.org/RPM-GPG-KEY-elrepo.org

3、为CentOS-7安装ELRepo (install ELRepo for CentOS-7)

1
[root@dev ~]# yum install -y https://www.elrepo.org/elrepo-release-7.0-4.el7.elrepo.noarch.rpm

4、安装yum-plugin-fastestmirror (Install yum-plugin-fastestmirror)

1
[root@dev ~]# yum install -y yum-plugin-fastestmirror

5、查看可以安装的kernel (Show the kernel that can be installed)

1
[root@dev ~]# yum --enablerepo=elrepo-kernel provides kernel

6、安装最新kernel,或安装执行版本的kernel (Install the latest kernel, or install the executable version of the kernel)

1
2
3
[root@dev ~]# yum --enablerepo=elrepo-kernel install kernel-ml
or
[root@dev ~]# yum --enablerepo=elrepo-kernel install kernel-lt-4.4.190-1.el7.elrepo.x86_64

7、设置默认的启动内核 (Set the default boot kernel)

1
2
3
4
5
6
7
8
9
10
11
[root@dev ~]# cat /boot/grub2/grub.cfg | grep "CentOS Linux"
menuentry 'CentOS Linux (4.4.190-1.el7.elrepo.x86_64) 7 (Core)' --class centos --class gnu-linux --class gnu --class os --unrestricted $menuentry_id_option 'gnulinux-3.10.0-862.el7.x86_64-advanced-a66de569-ad95-4599-9f1e-37c19744ace0' {
menuentry 'CentOS Linux (3.10.0-957.21.3.el7.x86_64) 7 (Core)' --class centos --class gnu-linux --class gnu --class os --unrestricted $menuentry_id_option 'gnulinux-3.10.0-862.el7.x86_64-advanced-a66de569-ad95-4599-9f1e-37c19744ace0' {
menuentry 'CentOS Linux (3.10.0-862.3.2.el7.x86_64) 7 (Core)' --class centos --class gnu-linux --class gnu --class os --unrestricted $menuentry_id_option 'gnulinux-3.10.0-862.el7.x86_64-advanced-a66de569-ad95-4599-9f1e-37c19744ace0' {
menuentry 'CentOS Linux (3.10.0-862.el7.x86_64) 7 (Core)' --class centos --class gnu-linux --class gnu --class os --unrestricted $menuentry_id_option 'gnulinux-3.10.0-862.el7.x86_64-advanced-a66de569-ad95-4599-9f1e-37c19744ace0' {
menuentry 'CentOS Linux (0-rescue-167a8b301e76475680ccb38e7d691aab) 7 (Core)' --class centos --class gnu-linux --class gnu --class os --unrestricted $menuentry_id_option 'gnulinux-0-rescue-167a8b301e76475680ccb38e7d691aab-advanced-a66de569-ad95-4599-9f1e-37c19744ace0' {

[root@dev ~]# grub2-set-default "CentOS Linux (4.4.190-1.el7.elrepo.x86_64) 7 (Core)"

[root@dev ~]# grub2-editenv list
saved_entry=CentOS Linux (4.4.190-1.el7.elrepo.x86_64) 7 (Core)

8、重启机器 (Restart the machine)

1
[root@dev ~]# reboot

9、重启后验证是否成功 (Verify successful after reboot)

1
2
[root@dev ~]# uname -r
4.4.190-1.el7.elrepo.x86_64

10、删除老kernel,–count flag用于指定要在系统上保留的内核数 (Delete the old kernel, the –count flag is used to specify the number of cores to keep on the system)

1
2
3
[root@dev ~]# yum install -y yum-utils

[root@dev ~]# package-cleanup --oldkernels --count=2

以太网连接

  • 在Linux中,以太网接口被命名为:eth0、eth1等,0、1代表网卡编号。

  • 通过lspci命令可以查看网卡硬件信息(如果是usb网卡,则可能需要使用lsusb命令)

  • 命令ifconfig命令用来查看接口信息

    ifconfig -a 查看所有接口

    ifconfig eth0 查看特定接口

  • 命令ifup、ifdown用来启用、禁用一个接口

    ifup eth0

    ifdown eht0

1
2
3
4
5
6
7
8
9
10
11
12
[root@aio1 ~]# ifconfig ens33
ens33: flags=4163<UP,BROADCAST,RUNNING,MULTICAST> mtu 9000
inet 192.168.46.200 netmask 255.255.255.0 broadcast 192.168.46.255
inet6 fe80::b3f5:7411:df98:1d00 prefixlen 64 scopeid 0x20<link>
ether 00:0c:29:1d:7b:de txqueuelen 1000 (Ethernet)
RX packets 16673 bytes 23150661 (22.0 MiB)
RX errors 0 dropped 0 overruns 0 frame 0
TX packets 2645 bytes 223690 (218.4 KiB)
TX errors 0 dropped 0 overruns 0 carrier 0 collisions 0

RX packets 接收包数量
TX packets 发送包数量

网络相关配置文件

  • 网卡配置文件

    /etc/sysconfig/network-scripts/ifcfg-ens8f0

    1
    2
    3
    4
    5
    6
    7
    8
    9
    10
    11
    12
    13
    14
    15
    16
    17
    18
    19
    20
    TYPE=Ethernet									# 类型=以太网
    PROXY_METHOD=none #
    BROWSER_ONLY=no #
    BOOTPROTO=none # 启动协议
    DEFROUTE=yes #
    IPV4_FAILURE_FATAL=no #
    IPV6INIT=yes #
    IPV6_AUTOCONF=yes #
    IPV6_DEFROUTE=yes #
    IPV6_FAILURE_FATAL=no #
    IPV6_ADDR_GEN_MODE=stable-privacy #
    NAME=ens33 #
    UUID=3434b388-c4db-4130-bf90-3e34115fe2d3 # UUID,统一标识符
    DEVICE=ens33 # 设备名称
    ONBOOT=yes # 服务器启动时,自动启用

    IPADDR=192.168.46.200 # IP地址
    NETMASK=255.255.255.0 # 子网掩码
    GATEWAY=192.168.46.2 # 网关
    DNS1=192.168.46.2 # DNS
  • DNS配置文件

    /etc/resolv.conf

    1
    2
    3
    # Generated by NetworkManager
    search localdomain
    nameserver 192.168.46.2
  • 主机名配置文件

    /etc/sysconfig/network

  • 静态主机名配置文件

    /etc/hosts

网络测试命令

  • 测试网络连通性

    ping 192.168.1.1

    ping www.baidu.com

  • 测试DNS解析

    1
    yum install -y bind-utils

    host www.baidu.com

    1
    2
    3
    4
    5
    域名到IP地址的解析
    [root@dev ~]# host www.baidu.com
    www.baidu.com is an alias for www.a.shifen.com.
    www.a.shifen.com has address 61.135.169.125
    www.a.shifen.com has address 61.135.169.121

    dig www.baidu.com

  • 显示路由表

    ip route

    1
    2
    3
    4
    5
    6
    7
    8
    9
    10
    11
    12
    [root@aio1 ~]# ip route
    default via 192.168.46.2 dev ens33 proto static metric 100 #跟我不在一个网段的,发给default
    default via 192.168.46.2 dev ens34 proto static metric 101
    default via 192.168.46.2 dev ens35 proto static metric 102
    default via 192.168.46.2 dev ens36 proto dhcp metric 103
    172.29.232.0/22 dev br-dbaas proto kernel scope link src 172.29.232.100
    192.168.46.0/24 dev ens33 proto kernel scope link src 192.168.46.200 metric 100
    192.168.46.0/24 dev ens36 proto kernel scope link src 192.168.46.137 metric 103
    192.168.46.2 dev ens34 proto static scope link metric 101
    192.168.46.2 dev ens35 proto static scope link metric 102
    192.168.100.0/24 dev ens34 proto kernel scope link src 192.168.100.200 metric 101
    192.168.200.0/24 dev ens35 proto kernel scope link src 192.168.200.200 metric 102
  • 追踪到达目标地址的网络路径

    1
    yum install -y traceroute

    traceroute www.baidu.com

  • 使用mtr进行网络质量测试(结合了traceroute和ping)

    1
    yum install -y mtr

    mtr www.baidu.com

修改主机名

  • 实时修改主机名

    1
    hostname train.linuxcast.net
  • 永久性修改主机名

    1
    2
    3
    /etc/sysconfig/network

    HOSTNAME=train.linuxcast.net

    故障排查

网络故障排查遵循从底层到高层、从自身到外部的流程进行

  • 先查看网络配置信息是否正确

    IP地址

    子网掩码

    网关

    DNS

  • 查看到达网关是否连通

    ping 网关IP地址

  • 查看DNS解析是否正常

    1
    host www.baidu.com
  • traceroute www.baidu.com

视频地址:https://www.youtube.com/channel/UCPhn2rCqhu0HdktsFjixahA

原文地址:https://github.com/twtrubiks/Git-Tutorials

本文档只作为学习笔记,方便自己速查,如果想系统学习请看沈老师的视频和github。

如何加速大型repo clone速度

  • –depth参数:只下载最新1次commits log,默认会加–single-branch(只clone单分支,无法checkout)。如果想clone所有分支需要加–no-single-branch(git clone https://github.com/ceph/ceph.git –depth 1 –no-single-branch),可以checkout。
1
2
3
4
5
6
7
8
9
10
11
12
13
14
15
16
17
18
19
20
21
yujiangdeMacBook-Pro-13:test yujiang$ git clone https://github.com/ceph/ceph.git --depth 1
Cloning into 'ceph'...
remote: Enumerating objects: 8395, done.
remote: Counting objects: 100% (8395/8395), done.
remote: Compressing objects: 100% (7508/7508), done.
remote: Total 8395 (delta 1133), reused 2722 (delta 467), pack-reused 0
Receiving objects: 100% (8395/8395), 21.01 MiB | 1.52 MiB/s, done.
Resolving deltas: 100% (1133/1133), done.
Checking out files: 100% (8847/8847), done.
yujiangdeMacBook-Pro-13:test yujiang$ cd ceph/
yujiangdeMacBook-Pro-13:ceph yujiang$ git log
commit 6b0ef5dc3c550cd8d17c830156541dd491e9a57a (grafted, HEAD -> master, origin/master, origin/HEAD)
Author: Alfredo Deza <adeza@redhat.com>
Date: Tue Aug 20 09:32:05 2019 -0400

Merge pull request #29762 from alfredodeza/bz-1738379

ceph-volume: use the OSD identifier when reporting success

Reviewed-by: Jan Fajerski <jfajerski@suse.com>

git subtree

git submodule是link的概念

git subtree是copy的概念

https://github.com/git/git/blob/master/contrib/subtree/git-subtree.txt

create git subtree

1
2
3
4
5
6
7
8
9
10
11
12
13
14
1、首先clone主repo
git clone --recurse-submodules -j8 git@github.com:lnsyyj/lnsyyj-ansible.git
2、进入主repo
cd lnsyyj-ansible
3、添加子repo
git subtree add --prefix=roles/elasticsearch --squash git@github.com:lnsyyj/ansible-role-elasticsearch.git master
git subtree add --prefix=roles/kibana --squash git@github.com:lnsyyj/ansible-role-kibana.git master

git subtree add --prefix=roles/cloudalchemy.node-exporter --squash git@github.com:cloudalchemy/ansible-node-exporter.git master
git subtree add --prefix=roles/cloudalchemy.prometheus --squash git@github.com:cloudalchemy/ansible-prometheus.git master


--squash 合并子repo的git log
--prefix= 指定copy到主repo的位置

push git subtree

1

pull git subtree

1

常见问题1

1
2
3
4
5
6
7
8
fatal: early EOF
fatal: the remote end hung up unexpectedly
fatal: index-pack failed
error: RPC failed; curl 18 transfer closed with outstanding read data remaining

解决办法:
git config --global http.postBuffer 5242880000
git clone https://github.com/ansible/ansible.git

公司内部搭建mirror的好处:可以节省大量时间、控制版本、节省公司外网带宽(尤其是国内很多公司基于开源软件搞定制化二次开发),同时也可以纳入发布流程当中。

yum可以通过FTP或HTTP传输文件,这里只实验HTTP方式。

server端(搭建的mirror端)

1、首先安装Nginx

1
sudo yum install -y epel-release && sudo yum install -y nginx 

2、安装createrepo工具(负责将.rpm放到repomd repository)

1
sudo yum install -y createrepo yum-utils

3、在本地创建目录,存储repositories

1
sudo mkdir -p /usr/share/nginx/repos/ceph/rpm-nautilus/el7/{SRPMS,aarch64,noarch,x86_64}

4、修改centos源

1
2
3
4
5
6
7
8
9
10
11
12
13
14
15
16
cat /etc/yum.repos.d/ceph_163.repo 

# $basearch is x86_64, can be modified
[ceph]
baseurl = http://mirrors.163.com/ceph/rpm-nautilus/el7/$basearch
gpgcheck = 0
gpgkey = http://mirrors.163.com/ceph/keys/release.asc
name = Ceph Stable $basearch repo
priority = 2

[noarch]
baseurl = http://mirrors.163.com/ceph/rpm-nautilus/el7/noarch
gpgcheck = 0
gpgkey = http://mirrors.163.com/ceph/keys/release.asc
name = Ceph Stable noarch repo
priority = 2

5、导入GPG Key

1
curl https://mirrors.163.com/ceph/keys/release.asc | gpg --import -

6、下载官方repositories到本地服务器

1
2
3
4
sudo reposync -g -l -d -m --repoid=ceph --newest-only --download-metadata --download_path=/usr/share/nginx/repos/ceph/rpm-nautilus/el7/x86_64/
sudo reposync -g -l -d -m --repoid=noarch --newest-only --download-metadata --download_path=/usr/share/nginx/repos/ceph/rpm-nautilus/el7/noarch/

同步后,目录层级会不同,在download_path后面会自动加一层repoid指定的名字,需要自行调整。

7、创建new repository

1
2
3
4
sudo createrepo /usr/share/nginx/repos/ceph/rpm-nautilus/el7/x86_64/
sudo createrepo /usr/share/nginx/repos/ceph/rpm-nautilus/el7/noarch/

这时会在相应的目录中生成repodata

8、修改Nginx配置

1
2
3
4
5
6
7
8
server { 
# 修改
autoindex on;
root /usr/share/nginx/repos/;
}

启动nginx
systemctl start nginx && systemctl enable nginx

client端(使用mirror端)

在/etc/yum.repos.d/中增加新的源

1
2
3
4
5
6
7
8
9
10
11
12
13
14
[root@dev ~]# cat /etc/yum.repos.d/ceph_stable.repo 
[ceph_stable]
baseurl = http://10.121.9.103/ceph/rpm-nautilus/el7/$basearch
gpgcheck = 1
gpgkey = https://download.ceph.com/keys/release.asc
name = Ceph Stable $basearch repo
priority = 2

[ceph_stable_noarch]
baseurl = http://10.121.9.103/ceph/rpm-nautilus/el7/noarch
gpgcheck = 1
gpgkey = https://download.ceph.com/keys/release.asc
name = Ceph Stable noarch repo
priority = 2

原文地址

OVERVIEW

ceph-volume旨在成为一个单一用途的命令行工具,将logical volumes部署为OSDs,在preparing, activating, 和creating OSDs时,试图维护与ceph-disk类似的API。

因为它不依赖于为CEPH安装的UDEV规则且没有交互,因此它背离了ceph-disk。这些rules允许自动检测先前设置的devices,这些devices又被送入ceph-disk以activate它们。

REPLACING CEPH-DISK

ceph-disk工具是在项目需要支持许多不同类型的init系统(upstart, sysvinit, etc…)时创建的,同时能够发现devices。这导致工具最初(以及后来)专注于GPT分区上。特别是在GPT GUID上,它以独特的方式标记device,以回答以下问题:

  • device是否是Journal?
  • 是否是encrypted data partition(加密数据分区)?
  • device是否已部分准备就绪?

为了解决这些问题,它使用UDEV规则来匹配GUID,这些GUID将调用ceph-disk,最后在ceph-disk systemd unit和ceph-disk可执行文件之间来回切换。该过程非常不可靠且耗时(必须为每个OSD设置接近3小时的超时),并且会导致OSD 在节点的boot过程中根本不出现。

考虑到UDEV的异步行为,很难调试甚至复现这些问题。

由于ceph-disk的world-view必须是专门的GPT分区,这意味着它无法与其他技术(如LVM或类似的device mapper devices)一起使用。它最终决定创建一些模块化的东西,从LVM支持开始,并根据需要扩展其他技术。

GPT PARTITIONS ARE SIMPLE?

尽管分区通常很容易理解,但ceph-disk分区并不简单。它需要大量特殊标志才能使它们与device discovery工作流程一起正常工作。以下是创建数据分区的示例调用:

1
/sbin/sgdisk --largest-new=1 --change-name=1:ceph data --partition-guid=1:f0fc39fd-eeb2-49f1-b922-a11939cf8a0f --typecode=1:89c57f98-2fe5-4dc0-89c1-f3ad0ceff2be --mbrtogpt -- /dev/sdb

创建这些不仅很难,而且这些分区要求device由 Ceph 独占。例如,在某些情况下,在device加密时将创建一个特殊分区,其中包含未加密的密钥。这是ceph-disk领域的知识,它不会转变对”GPT partitions are simple”的理解。下面是正在创建的特殊分区的示例:

1
/sbin/sgdisk --new=5:0:+10M --change-name=5:ceph lockbox --partition-guid=5:None --typecode=5:fb3aabf9-d25f-47cc-bf5e-721d181642be --mbrtogpt -- /dev/sdad

MODULARITY

ceph-volume被设计成一个模块化工具,因为我们预计人们会使用多种方式来配置硬件设备。目前已有两个情况:传统的ceph-disk devices仍然在使用并且有GPT分区(handled by simple)和lvm。

我们直接从用户空间管理NVMe devices的SPDK devices即将出现,LVM将无法在那里工作,因为根本不涉及内核。

CEPH-VOLUME LVM

通过使用LVM tagslvm子命令能够保存并随后重新发现和查询与OSD相关联的devices,以便可以激活(activate)它们。 这包括对基于LVM的技术(如dm-cache)的支持。

对于ceph-volume,dm-cache的使用是透明的,对于工具没有区别,它将dm-cache视为普通logical volume。

LVM PERFORMANCE PENALTY

简而言之:我们未能注意到与LVM更改相关的任何重大性能损失。 通过与LVM合作,可以使用其他device mapper技术(例如dmcache):处理任何位于Logical Volume以下的事情没有技术困难。